24-06-2020 by Wiebo Troost
Getting started with Angular using Material
Back in 2017 I wrote a post about the Angular CLI, and how it has made creating and maintaining an Angular project so much simpler.
Since then Angular and the Angular-cli have undergone many changes, and many new features have been added. The integration of Material, and the introduction of schematics are certainly not new, but I still see people having problems with the setup of new Material based Angular projects. In this article we'll quickly get to the stumbling blocks and show an easy way to complete the setup and get you coding quickly.
1. Getting started
The basic startup of the project has not changed since the last post. You need to have a recent version of Node and NPM installed, at which point you can install the angular client.
npm install -g @angular/cli
This enables the ng command in your command shell. ng --version should show the current version of the cli and related dependencies.
2. Create the new project
As before, you can use ng new to create a new project. The Cli will ask a few questions to get the project started properly. Select 'yes' for routing (more on that later) and select SCSS for the stylesheet format, which works will with Material themes later on in your project.
After the Cli completes, you have a new project ready to go in a new folder that is named to match your project.
In that folder you can use your shell to call npm start, the application will compile the application and start the development
server. By default the app will start on localhost, port 4200.
Browse to http://localhost:4200 to have a look.
3. Let's have a look.
Before we go ahead and add Material, it is a good idea to have a look at the project, so we understand what is happening when the browser loads the page and starts the application. There are three aspects to loading the angular app:
First we'll look at the app.module.ts file. In there you'll see that the bootstrap component is listed as AppComponent.
Second, let's have a look at the app.component.ts and notice that the selector is set to app-root.
Finally, the index.html is using the <app-root></app-root> selector to render the app.component and everything it contains.
We'll come back to these after we've added Material.
4. Material Schematics
Adding Material to your project is as simple as running:
ng add @angular/material
However, you'll quickly notice that the site running at localhost:4200 still looks the same. At this point we can create a new app.component.ts that uses the Material toolbar and navigation. The schematics that come with Material allow us to quickly generate a navigation component, but it does nothing for replacing the three items required to load the Angular app in the browser. It is best to make this change in such a fashion that preserves src\app.component.ts in the root of your project. That way your project will look the same as every other project created with the ng new command. This means that we can either edit or replace the app.component.* files in the src folder. It's simpler and quicker to replace the files so let's go for it!
First, let's use the schematics to generate the content we need:
ng generate @angular/material:navigation app
This creates a new app.component.ts (with *.spec and *.html files) in a new app folder in the project. Go ahead and use these files to replace the app.component.ts, app.component.html and app.component.spec.ts files in the src folder of the project. In order to make things work again, you'll need to edit the app.component.ts file and change the selector back to app-root. At this point we've aligned all three elements of starting the app with content from Material.
After running npm start once more, you'll see that you now have a standard Material design app.component.ts.
5. Start building your app with Material
Building your application will involve creating custom components and navigating to them using the Angular Router. This means that we need to render the router outlet in the new app.component.html. At the bottom of the file, replace the comment that reads 'Add Content Here' with <router-outlet></router-outlet>.
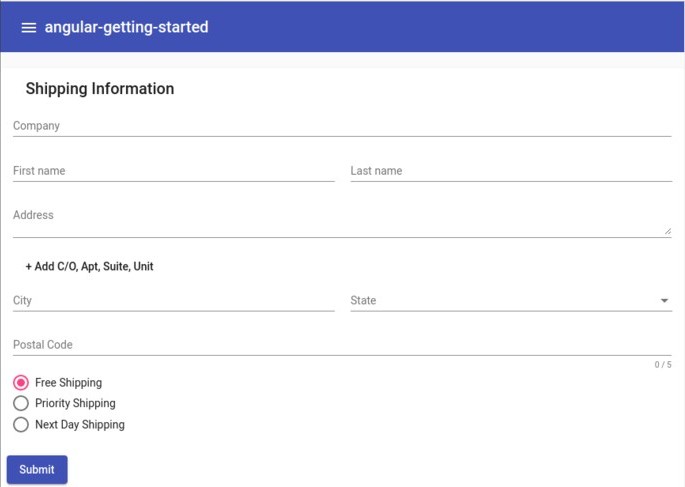
Now we're ready to create a new component and render it through the router. I find the address form schematic of Material helpful, because it provides a good example of using Material for form inputs. Let's generate an edit-address component:
ng generate @angular/material:address-form edit-address
For the purposes of this example, we'll create an edit route and use it as the default route in the application. For that we need to edit the app-routing.module.ts. We need to edit the routess array as follows:
[{
  path:"edit",
  component: EditAddressComponent
},
{
  path: "",
  pathMatch:"full",
  redirectTo:"edit"
}];
Make sure to import the new EditAddressComponent. At this point, your application will render the address form when you access localhost:4200. You're now in a good place to continue building out your application.
Conclusion
Leveraging the new features in the Angular Cli, along with the Material Design schematics, you can quickly get started with a brand new Angular Material project. These tools allow you to quickly start work on your custom application rather than spending time on the boilerplate necessary to run your app. At BinaryOps we maintain a library of common solutions to further enhance our productivity when starting a new project. Feel free to reach out and start a conversation about how we can help get your project started!
